If your research project is producing workflows, they should be registered in WorkflowHub:
- To give visibility to the workflows created by a project, and by the different networks and communities within the project
- To give visibility to the workflows used by a project
- To share workflows across a project, within project networks and externally
- To credit and cite the people making workflows, and the networks to which they belong
- To track the new versions of workflows as they are produced, and
- To retain workflows for post-project use by a project’s members, their networks, and the broader scientific community
This generic version of Guide to Using WorkflowHub is intended to be cloned and customised for particular research projects, organisations and initiatives to form part of their project documentation.
Authors: Carole Goble, Finn Bacall, Stian Soiland-Reyes, Ove Johan Ragnar Gustafsson, Rafael Andrade Buono
Cite as: https://doi.org/10.48546/workflowhub.sop.13.4
A workflows organisation in WorkflowHub
Even small workflow projects can be complex. As the individuals, networks and institutions that come together to develop workflows grow, so does this complexity. The contributors to such work need to be visible as workflow developer communities in their own right. At the same time they need to have both the workflows they bring to the project, and develop for the project, visible as their workflows.
To address this, the WorkflowHub has 3 primary organisational structures that can be used by any workflow project.
Space
Describes a broad activity, such as a project consortium or a long-running activity. Within the Space are Teams.
- A Space is self-administered.
- The administrator has the power to create Teams.
- A Space can have any number of Teams.
- A Team (see below) can only be associated with one Space.
- You can be a member of any number of Spaces.
Team
A group of one or more people collaborating together on a particular activity. The Team provides the ability to describe and promote the activity and give credit back to the team.
- A Team is self-administered.
- The Team administrator has the power to control the Team membership, and set default sharing permissions and licence across all members.
- Before you can register anything you need to be a member of a Team.
- You can be a member of any number of Teams.
- All workflows have to be registered with at least one Team, and can be registered with any number of Teams, which could also belong to different Spaces. This allows multiple Teams and Spaces to collaborate on specific workflows.
Collection
A group of workflows explicitly curated into a collection (e.g. by domain, topic, or analytical approach). These are a way of gathering workflows in one place from across different Teams and different Spaces.
- A collection is self-administered and managed by one or more nominated maintainers.
- The workflows that are being put into the collection must already be registered with at least one Team.
- A workflow can be registered with any number of collections.
Structures for WorkflowHub Projects use cases
Making use of Spaces and Teams
Spaces and Teams can be used to represent almost any type of research project or collaboration that requires the registration of computational workflows, ranging from individual workflow developers through to international research programs or science missions. In each case, the structure of your presence on WorkflowHub can be tailored to allow all contributors to gain credit, and for their contributions to be visible when workflows are found, explored and reused by the broader research community.
Three stereotypical project setups:
- A consortium of pre-existing partners, where the consortium and the partners need to have visibility and credit for the workflows, and the consortium may disband (because it is a project)
- A large project and/or infrastructure effort, where workflows need to be made discoverable and reusable
- An independent Team of workflow developers, or an independent developer, where the member(s) of the Team need to have visibility and credit for a dynamic set of workflows (legacy, stable and being maintained, in development) but don’t manage a Space.
Below are examples of how WorkflowHub can help organise workflows for these different setups.
International project consortium
Space: BY-COVID
Teams:
- BY-COVID (general): This Team will register the workflows that can be organised into collection(s) of workflows used in BY-COVID
- BY-COVID Baseline Use Case: SARS-CoV-2 Vaccine(s) effectiveness in preventing SARS-CoV-2 infection - The Team contains workflow information related to an international collaboration on a use case of BY-COVID
Infrastructure
Space: Australian BioCommons
Teams:
- Australian BioCommons (general)
- Galaxy Australia: This Team contains a set of curated workflows available for the https://usegalaxy.org.au/ instance
Independent team
Space: Independent Teams (some that are inactive not included)
Teams:
- IWC: This Team contains workflows from the Intergalactic Workflows Commission.
- OME: This Team contains workflows related to the open microscopy environment community for image processing.
- EuroScienceGateway: This Team registers the workflows related to the EuroScienceGateway project.
Using Collections to group workflows
Workflows can be grouped into collections. This allows users to organise workflows according to specific themes of their choice or to collect sets of workflows to be used in different contexts. For example, the workflow ERGA DataQC ONT v2311 (WF0) is used as an initial step in two different collections:
- ERGA Assembly Galaxy ONT+Illumina & HiC Pipelines (NextDenovo-HyPo + Purge_Dups + YaHS), and
- ERGA Assembly Galaxy ONT+Illumina & HiC Pipelines (Flye-HyPo + Purge_Dups + YaHS)
Both collections are managed by the ERGA Assembly Team. Members of other Teams can be added as Maintainers if required, which allows them to add and remove workflows from the collection.
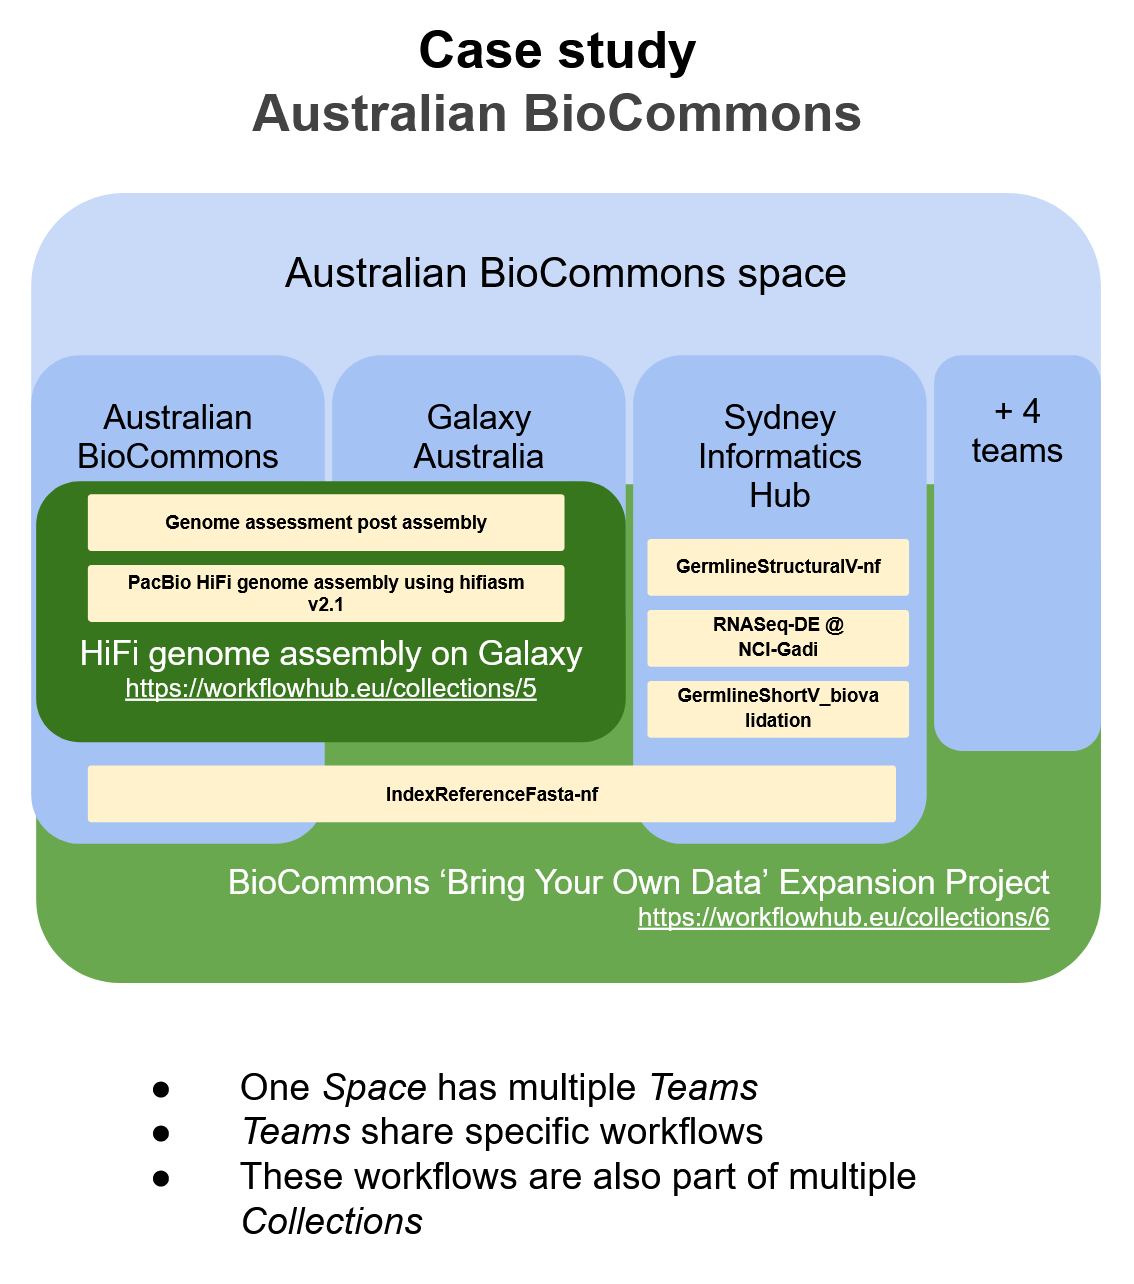
Case study: Australian BioCommons
An example of the application of this guide is given with the case of the Australian BioCommons Space. The Space contains multiple Teams. These include service related Teams such as the Galaxy Australia Team, and research facilities such as the Sydney Informatics Hub Team. Workflows are registered and maintained by Teams individually or in combination. For example, the Somatic-ShortV-nf workflow is registered under both the Australian BioCommons and the Sydney Informatics Hub Teams.
Registering workflows in WorkflowHub
Joining WorkflowHub
- Log in to WorkflowHub
- Register an account, or
- Log in using either GitHub or institutional credentials.
- If relevant, make sure your WorkflowHub organisation matches that of required collaborative partners or institutions
- Either Create, or Request to Join any Spaces and/or Teams that may be relevant to you. If there is a Project-specific versions of this guide it give you links to the relevant spaces or teams, see https://workflowhub.eu/sops
Registering a workflow in WorkflowHub
To register a workflow:
- Log in to WorkflowHub
- Pick
Workflowfrom the+menu in the top navigation bar. - You will be asked for the Team(s) it should be registered with.
- A workflow may be registered with many Teams. You must be a member of the Team to be able to register it there.
- Add description metadata to the workflow including tags. New tags can be added if required.
Adding a workflow to another Team
You uploaded a Workflow to a Team and now want to add it to another Team, maybe in a different Space:
- Log in to WorkflowHub
- Select
Manage Workflowfrom the “Actions” drop down menu. - In the
Manage Workflowpop-up, select the Team that you would like to add to - Click the
Updatebutton at the bottom of the screen.
Moving a workflow from one Team to another
You realised you put the workflow in the wrong Team?
- Log in to WorkflowHub
- Select
Manage Workflowfrom theActionsdrop down menu. - In the
Manage Workflowpop-up:- Add the workflow to the Team you want it added to.
- Click the red cross next to the Team name you want it removed from.
- Click the
Updatebutton at the bottom of the screen.
Linking your workflow GitHub repository with WorkflowHub
During registration of the workflow:
- Log in to WorkflowHub
- Pick
Workflowfrom the+menu in the top navigation bar - Make sure to choose the
Import Git Repositoryoption in the workflow registration wizard - Add your GitHub repository URL and click
Register - Use the wizard to complete the registration process
Using the LifeMonitor App for automatic integration and versioning of workflows:
Follow the instructions available in the LifeMonitor documentation to install the app in your repository or organisation Make sure to configure the “GitHub integration” in the “Settings” menu to: Version based on a specific branch, and Automatically check for issues and suggest pull requests To integrate with WorkflowHub you need to activate this feature in the “Registry Integration” tab in the “Settings” menu. You also need to give the LifeMonitor app access permissions for your WorkflowHub account.
Keeping workflows up-to-date
Workflows will keep being updated and those new versions will also need to appear on the WorkflowHub. Before you update a registered workflow, you need to ensure that you:
- Are logged in to WorkflowHub.
- Have the rights / permissions to change the workflow.
- Are on the workflow page of the workflow.
Update the metadata of a workflow
- Go to the
Actionsdropdown menu - Click
Edit Workflowto change the metadata of the registered workflow.
Note that you need to use Manage workflow to change its permissions or team ownership.
Update the workflow version manually
If the workflow was uploaded manually, or via an RO-Crate
Files can be added/removed/modified via the Files tab if the current version is Open.
A version must be Frozen before a new version can be created, or before a DOI can be minted.
To freeze a version
- Go to the
Actionsdropdown menu - Click
Freeze Versionto lock the current version to changes
To create a new version
- Go to the
Actionsdropdown menu - Click
New Version - Decide either to continue managing the files on WorkflowHub (
Upload/Import files), or switch to using a Git repository (Import Git Version).
If the workflow was imported via Git
- Go to the
Actionsdropdown menu - Click
New Version - Either confirm the repository URL, or enter a different one (in the event that the workflow has moved to a different repository)
- Select the branch/tag to import
- You may be prompted to reselect the main workflow if it can no longer be found
- Check / complete the metadata
Update the workflow version automatically from GitHub
Updating workflow versions automatically from GitHub or local Git is due for release in Q2 2024
Change the main workflow/abstract CWL/diagram
- Click on the
Filestab - Click
Annotate Files - Select a new main workflow/abstract CWL/diagram by clicking the respective field and navigating to the appropriate file in the popup that appears
- Optionally tick the
Re-extract metadata?checkbox if you would like WorkflowHub to attempt to extract metadata from the newly selected main workflow/abstract CWL - Optionally check and confirm the metadata if the checkbox was ticked
Linking workflows with other workflows
Workflows can be linked to other workflows in a number of ways
- By being in the same collection (see adding workflows to collections)
- By attribution, linking a workflow to one that it is derived from, as workflows are often variants of others. To attribute a workflow:
- Go to the
Actionsdropdown menu - Click
Edit Workflowand scroll down to the Attributions section, and click to expand it if it is not yet open. - Begin typing the title of a workflow to search, and select one of the results that appear.
- Scroll down and click
Updateto confirm the changes.
- Go to the
Linking workflows with data
Workflows can be linked to data by uploading or linking this data in WorkflowHub
- From the
Createmenu, selectData Files - Creating the record
- File Selection
- Here you have a choice of uploading files, or providing a reference as a URL to a file.
- Both of these are single-file links, you can consider providing a Zip or Tar archive if you have many files.
- Provide a good title and description.
- Be sure to include the relevant Team in the Teams List
- Be sure to add the relevant tags to your workflow. Tags should be agreed upon within your project.
- You can additionally link this dataset during creation to the correct workflows.
- File Selection
Alternatively if your dataset is already uploaded, then you can, under Actions → Edit Workflow, select your datasets from the Data Files section
Publishing workflows
Workflows registered in WorkflowHub that are public can be assigned a DOI (Digital Object Identifier) so that they can more easily be cited in academic work and enter the scholarly knowledge graphs.
WorkflowHub DOIs are registered with DataCite using the DataCite Metadata Schema, meaning that the metadata joins the scholarly knowledge graphs DataCite Commons PID Graph and OpenAIRE Research Graph (see this example).
You can assign DOIs for workflows you have registered and that you have been given write access to. You are not able to make DOIs for other people’s workflows.
The citation itself will appear on the workflow’s overview page.
Assigning a DOI has two steps
1. Check metadata
The metadata for the workflow will be part of the DataCite registration.
Before you mint a DOI, make sure you check the correctness of the metadata of the workflow entry, and, for publicly accessible workflows, that it makes sense for someone who may not know your research in detail.
Use both Actions -> Edit Workflow and Actions -> Manage workflow to fill in:
- Title (is it specific enough)
- Creators (you can include registered WorkflowHub users or others by name)
- Status of workflow
- Description
- License
For each of the registered users, check that their ORCID identifier has been registered. This ensures that the people will be uniquely identified. Users can edit “My Profile” to link to ORCID.
2. Freeze the workflow version
Once a DOI is assigned that workflow version is fixed as a snapshot. So before minting a DOI, we need to freeze the version of the workflow in WorkflowHub, so that its metadata stays consistent with the DOI registration. Each version of the workflow must be registered separately. You can create a new version of a workflow that has been assigned a DOI, without necessarily giving the new version a DOI yet.
Adding new Teams and collections
Adding new Teams
Teams in WorkflowHub are groupings of people and their research outputs. In most cases a single team is sufficient, but often in collaborative research it can be beneficial to have multiple teams. See Guide to organising your workflows on WorkflowHub for more information about organising Teams and Spaces.
- Log in to WorkflowHub
- Pick
Teamfrom the+menu on the top bar. - Untick the
WorkflowHub managed Space? - Enter the desired Space name into the
Specify a title for a new Spacefield. - Add the Team metadata - the more the better. Remember this will be publicly displayed and no description looks bad.
- Add the name of the affiliation that you are associated with for this Team. It doesn’t have to be the same Institution as other Teams, and it is not unusual for it to be different. Start to type the name of your institution, and existing options will be displayed for selection. If not, choose the top option to define a new one.
- The Administrators will be notified and you will get an email confirmation.
- Once approved you can add members or others can apply to join. As you created the Team you are the administrator. You can add other administrators. Define within your project a set of administrators so to avoid depending on a single person and risking losing access to the Team.
Adding new collections
- Log in to WorkflowHub
- Pick
Collectionfrom the+menu on the topbar. - Add the Teams associated with the collection. These will only be Teams where you are a member.
- Add the Maintainers of the Collection. You can add any WorkflowHub member as a maintainer, and they will be able to add and remove workflows from the collection.
- Tag collections as needed.
As a manager of collection you are able to add any resource in WorkflowHub to it, even if they are not owned by you or your teams.
It is recommended that each project/team have a generic collection like Workflows in EuroScienceGateway will full editing rights for the whole team – the purpose of such a collection is to allow linking of third-party workflows that are used or further developed by the project even if they don’t have ownership of that workflow.
Adding and removing a Workflow for an existing collection
To add a Workflow to a Collection
- Log in to WorkflowHub
- Select the workflow you want to add by selecting the magnifying glass icon on the top bar next to the WorkflowHub logo
- Select the button
Add Collectionin the top right (next to all the other buttons) for the Collections that you have access to. Select the one you want to add to - If the Collection you want to add to isn’t there then you are not in a Team associated with that Collection. You will need to go look at the Collection to see the Teams associated with it and request to join one of them.
To remove a Workflow from a Collection, or reorder it within the Collection
- Log in to WorkflowHub
- Go to the Collection
- Select the
Actionsbutton top right - To remove a workflow, click the
Delete?checkbox. - To re-order a workflow in the Collection click and drag the item using the blue numbered button on the left side above or below another item.
- To modify the comment on an item, type into the text box.
- Click the
Updatebutton at the bottom of the page
Other WorkflowHub features
Standard Operating Procedures
WorkflowHub can also be used to register SOPs. To register SOPs, you must be registered and logged in to your account. SOPs can be uploaded in a variety of formats (word files, e-lab notebooks, code, annotated spreadsheets etc), as well as being registered as a remote URL. Typically, projects will define the form their SOPs will take using a template.
SOPs are assets, just like Workflows. So anything you can do with a workflow (described above) you can do with a SOP.
- Log in to WorkflowHub
- From the top navigation bar, select
+ Create - From the dropdown menu, select
SOP - Select whether you wish to upload a
local file, using thechoose filebutton, or enter aRemote URLto locate your SOP - Complete the fields, this includes:
- Teams that the SOP is being registered with
- Sharing: publicly, with individuals, Teams, or Spaces - the wider the sharing the better visibility.
- Attributions: link to any existing SOPs that this SOP was based on.
- Workflows: links the SOP to existing workflows in WorkflowHub
- Click
Registerto submit the SOP
SOPs can be versioned, use Register new version to reupload or use a versioned link.
Registering WorkflowHub guides as SOPs
This document and its customised siblings, should also be registered as a SOPs using the WorkflowHub tag, see for instance EuroScienceGateway project’s guide https://doi.org/10.48546/workflowhub.sop.8.2. Indicate the SOP Generic Guide to using WorkflowHub as Attribution from the customised SOP, then assign it a DOI.
For WorkflowHub guides as SOPs it is recommended to use the following versioning system for the SOP entries:
- First SOP version is Remote URL to a Google Docs “live” version of the guide where project participants can suggest edits. The Google Doc link should be shared with global Comment permissions or already have such rights from the project’s Google Drive. Give that version a DOI, which is inserted in the top of this document and distributed in the project handbook.
- A versioned release/snapshot of the SOP is exported from Google Doc, e.g. to PDF or converted to Markdown (for the project’s own website or wiki).
- Use
Register new versionand either upload the PDF or link to the website (with a version-specific URL). You may assign a DOI to this version and link to it from project deliverables etc. – however any further updates are still done in Google Docs (version 1).
- Use
Multiple variants of the generic WorkflowHub guide can be used as starting point:
- Google docs version
- PDF version
- Open Document Format (e.g. for Word)
- Web version (this page, see Markdown source)
Events, Presentations and Publications
WorkflowHub supports metadata and links to Events, as well as registering Presentations and Publications.
- Select
Eventfrom the+ Createmenu - Fill out the metadata
Events can be linked to Publications and Presentations
- Go to the
Actionsdropdown menu - Click
Edit Event - Scroll to the
PublicationsorPresentationssection and click to expand it - Select the desired publication or presentation from the dropdown menu
- Click the
Updatebutton
Presentations, publications and SOPs can be linked to workflows in a similar way.